Tuesday 16 July 2013

Upholstered Chair - Summer Project #1

I was lucky enough to save this chair from the landfill about 3 years ago!  I liked the shape of the chair and knew with new fabric and some varnish that it could look great again.

Apologies for the lack of before photos but you can see the original fabric below, a thick faded yellow stripe:


This is the back rest cushion, which was just stapled down at the bottom.  It's attached to the chair with screws so you cannot see that bit.  One less bit to sew!


I did not know what was going on in the inside of the back rest, so it was interesting to remove the fabric cover and see the construction.
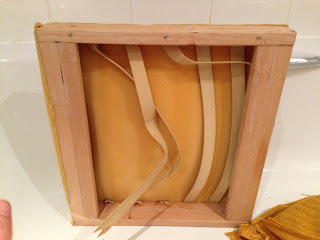

The webbing and foam needed replacing, I followed the instructions in a book called House Proud by Danielle Proud, which worked a treat.


My husband helped me stretch and attach the herringbone webbing with upholstery tacks.
I then tacked on a piece of hessian over the webbing.  The 1" foam was laid down on top of that and then lightweight batting was stretched down on top of the foam and stapled into place to hold down the foam.


To make the fabric for the back rest piece, I unpicked the back rest cover and used that as my pattern piece.  I have reupholstered the chair with Anna Maria Horner's "Drawing Room" fabric in home dec weight.


 The cover was just pulled down tight over the back rest frame and stapled firmly into place.

I made a box cushion to cover the new 3" foam seat pad, that has a zip fastening at the back

Obligatory gratuitous shots:


I am really proud of our efforts here.  My husband still has to sand and varnish the wood, but I've done my side of the bargain.  I bought all the webbing and upholstery supplies from ebay shops, and the foam locally.  Now that I know we have sorted out the structure, I wouldn't be worried about changing the fabric again.  Any questions, please ask.

Wednesday 26 June 2013

Hello, it wasn't meant to be this long

It may have appeared that i have fallen off the planet, but I've just been busy studying, working and raising a family.  In the summer break I have lined up a load of projects to tackle.  


The Hawthorn dress by Colette Patterns has queue jumped all the way to the top.  I am going to tackle version 3 (sleeveless shirt dress) in this bird print fabric which I found of ebay here.  


It is described as a cotton lawn, I am waiting for it to arrive.  To make it even more exciting there is a sew along on the Coletterie blog.  I will definitely be following that step by step.  Here's the schedule:  
  • June 26 – Buying fabric and making your muslin
  • July 1 – Full and Small bust adjustments
  • July 3 – Wide or narrow shoulder adjustments
  • July 5 – Fitting the cuffs (a quick and easy adjustment)
  • July 8 – Interfacing, Staystitching, Darts, and Shoulders
  • July 10 – Collar, Facings, and Side Seams
  • July 12 – Attaching the skirt or peplum
  • July 15 – Version 1, short sleeve
  • July 17 – Version 2, 3/4 length sleeve
  • July 19 – Version 3, Armhole
  • July 22 – Buttons, Hem, and Finishing
  • July 29 – Hawthorn Parade: Vote for your favorites!
Looks like I need to make by muslin ASAP!  I will only do that for the top as it's a wide skirt.

Will you be joining in? 

I also have to make up a cushion cover for a chair which has been waiting patiently for 3 years!