Showing posts with label sewing. Show all posts

Sunday, 26 February 2017

February Half Term Sewing


Tuesday, 24 July 2012

2012 Thank You Totes

I have been making these totes as thank you presents for three years now for my children's class teachers.  This year I went with the following measurements:
Front:
 w: 49cm x h:22cm for the top rectangle.
w: cm x h: 30cm for the two outer bottom rectangles
w:13cm x h: 30cm for the bottom middle rectangle

Back was w:49cm x h:52cm
1.5cm seams throughout 

You can see the front on the picture below:


  I also made some inside pockets.  One was a flat one and the other was a stand out one, I used directions from Lisa Lam's "Bag Making Bible" book.  They were all fully lined.


I went with three colour ways (the teacher's favourite colours) and my children embroidered the hearts.


I hope you like them as much as the teacher's did.  I think these make a great present, and tend to be much appreciated by the receiver.

Monday, 23 July 2012

Beignet ..a long journey!

Many many years ago (three in fact), I bought my first ever Colette Patterns skirt pattern, the Beignet.  I had my new machine, it allegedly did buttonholes like a dream (best not to look too closely at them!), I bought my fabric and I was all set to make this snazzy little number!

The pattern, itself, is a dream to make.  It has brilliantly written instructions, which are very easy to follow.  Sarai has set a very high standard for other independent pattern makers (and the big companies too).

Of course, my sewing standards are not quite as high as they were needed, and somehow, my hemming was atrocious, with a wonky bottom.  So I unpicked it all and put it away!  For THREE years!!!  Oh dear, was it really that long?

Well I have decided in this financially tight time, to get out all my WIP/ UFO and to complete them.  So the Beignet is finally finished.  It is a red linen skirt, for the spring/ summer.  It is fully lined, so it's quite warm,  I will definitely wear it, and I am pleased with it overall!

I also have a few patterns and fabric brought for some projects that I have not made yet.  I will probably try and do those too!

UPDATE:  Sew Magazine are offering the Taffy Blouse from the Colette Patterns Handbook as a free download to print and make

Friday, 8 June 2012

independent pattern companies


Firstly an apology.  I've taken a lot on in the last 9 months, hence the lack of posting.  Pretty soon I'll have a bit more time to do some things and with that in mind, the following, new (to me), pattern companies have caught my eye.

In no particular order here are my views:

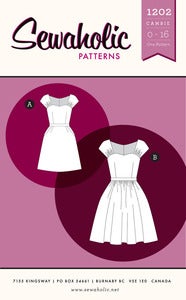
Sewaholic is a Canadian company run by Tasia.  She only has a few patterns so far, but they are already getting great reviews on blogsville.  I have nearly finished the Cambie dress, and can heartily recommend the pattern. Photos coming in a week or two!


Image of 1202 Cambie Dress

Colette Patterns, have been around for 2-3 years (I've mentioned them before)  Again well written patterns, great blog with tips and tutorials. Also Sarai has written a book, which I have and would recommend.

Salme Sewing Patterns is a company that I discovered via Craftsy that looks really appealing.  It's a British company with lots of contemporary simple tops, dresses and skirts.  I love this pleated T-shirt, I'm pretty sure I'll be making it soon, maybe in a navy chiffon fabric.  These patterns are downloadable, so a bit more faff, but cheaper and quicker to get.

  Image of  PDF Printable Sewing Pattern - T-shirt with pleats

Grainline Studios is small with just 3 patterns, but I'm sure more will be coming soon.  I've downloaded the Scout Woven Tee (below)  for $4.50 which looks like a wardrobe staple pattern.  Good reviews around the web as well about it.
Image of Scout Woven Tee


Pattern Runway has an informative blog and is selling downloadable patterns via Etsy, here are a selection:  I like the style here, again a contemporary look and good feedback.

Easy Short Sleeved Dress Pattern - Elastic Waist,  Short Kimono SleeveGorgeous Pussy Bow Blouse PDF Pattern that you can make at homeGathered Sundress PatternWomen's Draped Skirt Pattern


Here are a few other sites that I still need to look at:

Victory Patterns

Megan Nielson - who also has maternity sewing patterns.

And a recent blog post by Gertie on fitting dress patterns helped me choose more wisely what size Cambie Dress Pattern to cut out.  I suggest you take a look!  It's about looking at the finished garment size rather than the measurement table e.g. if you are 34 bust, 28 waist, 36 hip you need an x which usually leads to a wrong size dress.  I've certainly found that, ending up with huge waistbands on skirts etc.

Happy looking and hopefully I'll have a few projects sewn up soon!

Wednesday, 2 November 2011

on the sewing table

It's been a long time since I've done any sewing, not because I don't want to, but time pressures have placed restrictions on me.

I've bought a few patterns lately, which I need to buy fabric for. And one by one, I hope to make them over the coming months.

Firstly from the wonderfully written and designed Colette Patterns the cinnamon nightdress. I had hoped to make a summer sundress in a light cotton fabric, but now summer has gone maybe it'll be a heavier weight slinky satin/silk?


And hot off the presses the new Jasmine top. This is probably what I will make first. I just need to decide on some suitable fabric. I love the two tone one she has on her website. But it also looks great in one fabric too.


I haven't really made my children any clothing (apart from a shirt from Heather Ross's Weekend Sewing). But Oliver & S get great reviews, so I have purchased the Sandbox Pants to make for my younger son. If I can, I'll adjust them to make some for my eldest, who is a very tall 8.5 year old.

Finally, I was inspired by watching Gertie's Sew Retro class to make this dress. It's a Laura Ashley dress for McCalls M6350. You cannot buy this pattern in the UK (outrage!) so I had to buy it on-line from an eBay seller.

As you can see, lots of variety. I think the boy's trousers and the blouse have the biggest chance of being made any time soon! We shall see.

What have you got on your sewing table?

Wednesday, 5 October 2011

Doorstop Pattern Update


I have drawn up a scale version of my doorstop tutorial, to clarify all the measurements. I hope it helps.


A big thank you to all the lovely comments that I have had from everyone who has used my pattern.


Claire xox

Tuesday, 19 July 2011

Thank-You Tote Pattern

APOLOGIES: BLOGGER HAS GONE MAD WITH MY FORMATTING!!! V ANNOYING - and I've made a few edits.


I made this pattern last year for my son's teachers and sensationally failed to take any photos of my efforts. I got my act together this year!


Last year I used linen for my outer fabric, this year I used a cotton drill fabric. Any medium weight fabric should be good, especially if using a medium calico as a lining. This should give your bag the right amount of body and structure. He had 2 class teachers again so 2 bags have been assembled.


The pattern:
Components:
120cm x 65cm - Linen/ Cotton Drill/ Medium weight fabric - Bag Front
100cm x 52cm - Calico/ Lining fabric - Bag Lining
5 x 13cm x 13cm coordinating Patchwork squares

Cutting List:

Front of bag:
13cm x 52cm piece of linen,
32cm x 52cm piece of linen
4 x charm pack squares and 1 piece of linen/cotton drill that is embroidered (we did a simple heart - see above photo). approx measurements 13cm x 13cm
30x30 coordinating cotton fabric for inner pocket

Back of bag:
50cm x 52cm piece of linen/ cotton drill

Lining:
2x 50cm x 52cm calico/ cotton -
30cm x 30cm coordinating cotton - pocket
Straps:
2x 13cm x 110cm linen/cotton drill/ patchworked squares


Sew all the patchwork pieces together (I centred the embroidered square).


Sew the 13cm x 52cm to bottom edge of patchwork strip


Sew 32cm x 52cm to top edge of patchwork strip. This is the front of the bag.


Sew front of bag to back of bag, right sides together around the 2 sides and bottom (use 2cm seam)


Make a bucket bottom by sewing a triangle across the bottom corners (about 8cm from the point). Trim point off.


Add slip pocket to lining, this is now the RS.


To make a slip pocket, hem the top of pocket by turning it over twice by 0.5cm and stitching down. Turn in the other three sides by 0.5cm and press down. Pin onto lining and sewdirectly over where you have turned the three sides over by 0.5cm.


Repeat sewing the lining together, RS together - pocket needs to be on inside(BUT LEAVE A 10CM GAP IN THE BOTTOM EDGE FOR TURNING)


Repeat making a bucket bottom in the lining


Attach lining to main bag. Put the bag (right side facing out) inside the lining. You will see the wrong side of the lining. The RS of lining will be touching the RS of the bag.


Line up seams, and pin round at the top. Sew together (2cm seam) at the top edge.


Turn the right way round, by pulling the outside of the bag through the lining. Sew up 10cm hole at the bottom of the lining with a zig zag stitch. Press entire bag, top stitch 0.5cm from top edge to keep lining in place.


Attach handles by sewing them firmly on (I sew a square with an X inside at the top of each strap to the fabric - see above photo )


handle options:-


  1. Tough woven ribbon.


  2. Main Linen fabric - 13cm x110cm - sew together with 1cm seam, turn out.


  3. Patchwork handles
Trim all threads, press and your bag is ready to go!

dressmaking notions

I have been watching the lessons for the Sew Retro Bombshell Dress on Craftsy.com. There are a few tools that Gretchen uses, that I think would come in handy. She gives US links, but I've tried to track some of these things down in UK/ Europe.

Bracelet Pin Cushion
I have found it impossible to find anyone selling this fancy pin cushion bracelet in the UK but you can get it in France (except the postage to the UK is ridiculous! I could almost swim to France from where I live !!! Crazy) It's by Bohin - called a bracelet (dore) pelote velours. Here are some links : shop 1 & shop 2. Can anyone explain why postage to the UK is sky high from France?

If anyone knows of a UK shop selling these, please share! I have to say I think I would feel very professional wearing this as I sewed!


Tailors Ham

This is not as glam as the pin cushion, but probably more useful! It's for ironing curved seams on. Costs around £10. Link 1 and Link 2.


Dress Form
This is the biggest layout for any keen dressmaker. But what a brilliant tool. Great selection from here. I would love one of these. Expect to pay £100 - £150.

Waxed Tracing Paper
Gertie gets it from here. Not sure where you get this from in the UK. Have you ever seen it for sale? Following a thread on a sewing forum, people like the Clover Chacopy tracing paper. Get it here for £3.31 + p+p. You will need a tracing wheel/ pen as well.

Do you have any must have dressmaking tools? Or any that are a waste of time?

Monday, 11 July 2011

professional dressmaking course

We are still offline at home, but in my lunchbreak I've been catching up with Gretchen Hirsh's Sew Retro course on Craftsy.com. If you go to Gretchen's blog, she'll give you 50% off her course - you need her links or click mine!


I have to tell you about this course, it's amazing. I am a self taught dressmaker, so an intermediate sewer if you will. This course is showing me all the techniques I should be using, like trace basting, who knew about that? Also how to fit those Burda paper patterns together easily! Plus, more importantly small and large bust adjustments.

I can see a dress form is quite important for doing a good job with this style of dress. It's a fitted bustier style dress by Burda (the pattern is included as well as a download). Gretchen is also showing a few different skirt options, or making it as a top only.


Whether you want to make a dress in this style or not, the demostration of all the different techniques you need to make a well fitting garment is invaluable. For $29.99 you get 15 indepth classes showing you each step of the way.

I have watched about 1/3 of the courses and I've learnt quite a few new things. Even if you are a beginner sewer this course is great as you will be taught things that you may not know, or are yet to get to.

Once you have the course you can watch it and rewatch it indefinitely. Also you can add notes against the videos, and ask questions which Gretchen and others will reply to.

I do recommend checking out Gretchen's blog, as it's got loads of advice and interesting discussions on sewing.

Tuesday, 10 May 2011

the eagle has landed

Time has been running away from me again. After the fun extended break with so many bank holidays, we are now all getting back into our routine of work, school, nursery and home.

Each half term my son's school do a different project. This term it is about the rainforest (so I presume they will do some biology, geography, history etc within the topic). This Friday his class are doing a play about the rainforest. I do have to go to work, but when I saw what they were doing, I booked the morning off. (It's sad when you can't always get to see everything)

Last week, he came home with what he needed to do for the play. Number 1 learn lines, number 2 get an eagle costume together! Oh I do love another job, in our already choc-a-block week. My husband said he would take charge and get it done this week.

So yesterday (Monday) the eldest returned from school saying he needed the costume for today. Plans had to be changed as not all costume materials had been bought.

So with yellow card, that we had from are infamous Daffoldil hat and brown fabrics, left over from my sister's quilt, an eagle outfit was made!


The headpiece was made by my husband.


The wings that I made sewing 4 skinny quarters together, so they would overlap. I then hand cut all the "feathers" into the fabric. Then I hand stitched each wing onto the sleeves of a brown top (purchased for his last school play).


From the front, the graceful eagle still in his pjs.

Wednesday, 13 April 2011

weekend


Last weekend we had some good friends to stay, a wonky witch and a zombie lover! They came to support a family member running in the Brighton Marathon. They have 2 children, their youngest was only born in January.

As a present for the baby, I made him a quilt. I used the left over fabric from my son's Castle Peeps Quilt, and designed a quilt for him.

I can finally do a reveal:

For my son's quilt I used the pattern that Lizzy House made up. For this quilt I was inspired by other Castle Peeps Quilts I had seen on Flickr and other places. I measured all the fabric that I had left over, and designed the pattern so it used up all the fabric. (it was quite a headache due to the lack of peace and quiet in our house)


I didn't have enough fabric to do a traditional binding, so I sewed round the edges with 2 parallel rows of straight stitching. (the batting is enclosed as I sewed it right sides together and then flipped it to the right side out, and then I did the 2 rows of edge stitching.) I chose the diamond quilting design, as I felt that fitted in with the "medieval" look of the fabric.

I am very happy with this quilt.

Here's a reminder of my original quilt (from the Lizzy House pattern) :


I still have my eldest son's quilt to do. I'm not in a rush with that. And I have 2 quilt tops to either stick together or do 2 quilts from (they are from the Midwest Modern fabric range by Amy Butler) again, no rush!

Wednesday, 23 March 2011

wonky witch


A dear friend of ours has recently opened a rather lovely needlecraft e-shop named Wonky Witch.

The cross stitch patterns that she has in stock are really detailed and amazingly intricate and fabulously designed. But if like me, you've never tried it the Wonky Witch team also have some starter kits, which have some really sweet designs like this cute watering can.


Or for the experienced cross stitcher one of these designs from Bothy Threads.


If you have any questions, just send the Wonky Witches an email, and I know Zoe will get back to you very soon. And if you need another blog to read, look no further than here!